SpringCloud Alibaba Sentinel + SpringCloud Alibaba Nacos + SpringCloud Gateway 整合
这套组合,它们兼具了网关,熔断限流,还包括配置中心,注册中心,是作为一个微服务的基础。现在我们就来是用下这套组合,分析下优劣情况。
引入jar包
1
2
3
4
5
6
7
8
9
10
11
12
13
14
15
16
17
18
19
20
21
22
23
24
25
26
27
28
29
30
31
32
33
34
35
36
37
| <dependencies>
<dependency>
<groupId>org.springframework.cloud</groupId>
<artifactId>spring-cloud-starter-gateway</artifactId>
</dependency>
<dependency>
<groupId>com.alibaba.cloud</groupId>
<artifactId>spring-cloud-starter-alibaba-nacos-discovery</artifactId>
</dependency>
<dependency>
<groupId>com.alibaba.cloud</groupId>
<artifactId>spring-cloud-starter-alibaba-nacos-config</artifactId>
</dependency>
<dependency>
<groupId>org.springframework.boot</groupId>
<artifactId>spring-boot-starter-actuator</artifactId>
</dependency>
<dependency>
<groupId>com.alibaba.cloud</groupId>
<artifactId>spring-cloud-starter-alibaba-sentinel</artifactId>
</dependency>
<dependency>
<groupId>com.alibaba.cloud</groupId>
<artifactId>spring-cloud-alibaba-sentinel-gateway</artifactId>
</dependency>
<dependency>
<groupId>com.alibaba.csp</groupId>
<artifactId>sentinel-datasource-nacos</artifactId>
</dependency>
</dependencies>
|
项目概览
因为是进行流量控制,所有我们就在网关项目上引入上面jar创建项目。并根据官网说明加入如下配置:
1
2
3
4
5
6
7
8
9
10
11
12
13
14
15
16
17
18
19
20
21
22
23
24
25
| @Configuration
public class GatewayConfiguration {
private final List<ViewResolver> viewResolvers;
private final ServerCodecConfigurer serverCodecConfigurer;
public GatewayConfiguration(ObjectProvider<List<ViewResolver>> viewResolversProvider,
ServerCodecConfigurer serverCodecConfigurer) {
this.viewResolvers = viewResolversProvider.getIfAvailable(Collections::emptyList);
this.serverCodecConfigurer = serverCodecConfigurer;
}
@Bean
@Order(Ordered.HIGHEST_PRECEDENCE)
public SentinelGatewayBlockExceptionHandler sentinelGatewayBlockExceptionHandler() {
return new SentinelGatewayBlockExceptionHandler(viewResolvers, serverCodecConfigurer);
}
@Bean
@Order(-1)
public GlobalFilter sentinelGatewayFilter() {
return new SentinelGatewayFilter();
}
}
|
相关配置
这部分分为三个配置,一个是网关路由的配置,一个sentinel的配置,一个nacos的配置。我们的应用名定义为star-gateway
网关配置
1
2
3
4
5
6
7
8
9
10
11
12
13
14
15
16
17
18
19
20
21
22
23
24
| spring:
application:
name: star-gateway
cloud:
gateway:
metrics:
enabled: true
globalcors:
cors-configurations:
'[/**]':
allowedOrigins: "http://localhost"
allowedMethods:
- GET
- POST
- HEAD
- OPTIONS
- PUT
- PATCH
enabled: true
routes:
- id: demo01
uri: lb://star-app-demo01
predicates:
- Path=/demo01/**
|
nacos配置
1
2
3
4
5
6
7
8
| spring:
cloud:
nacos:
discovery:
server-addr: 127.0.0.1:8848
config:
server-addr: localhost:8848
file-extension: yml
|
sentinel配置
1
2
3
4
5
6
7
8
9
10
11
12
13
14
15
| spring:
cloud:
sentinel:
filter:
enabled: false
datasource:
local:
nacos:
data-id: gateway-sentinel
server-addr: ${SERVER_ADDR:127.0.0.1:8848}
group-id: DEFAULT_GROUP
data-type: json
rule-type: GW_FLOW
transport:
dashboard: 127.0.0.1:8080
|
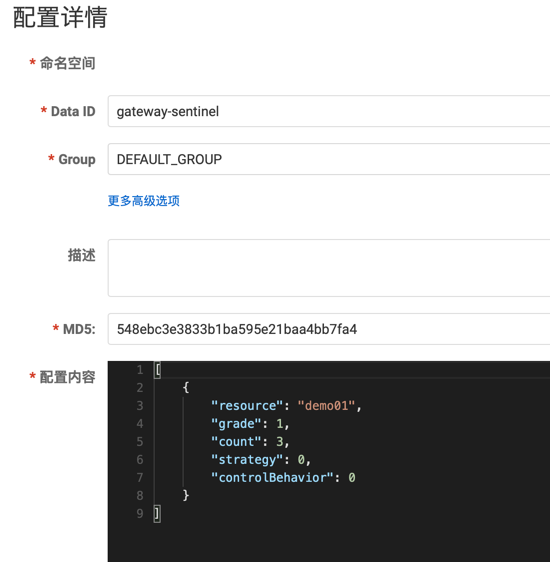
nacos中配置sentinel规则
启动nacos,进入nacos控制台,在配置管理模块新增配置。
- data-id: gateway-sentinel。和sentinel配置中nacos的配置相同
- group:DEFAULT_GROUP。和sentinel配置中nacos的配置相同
- data-type: json。选择json
- 配置内容: 可以配置多条规则。如下:
1
2
3
4
5
6
7
8
9
| [
{
"resource": "demo01",
"grade": 1,
"count": 3,
"strategy": 0,
"controlBehavior": 0
}
]
|
注: resource资源名,对应路由名
sentinel-dashboard
dashboard的具体使用就不赘述了,我们可以通过如下命令启动
1
| java -Dserver.port=8080 -Dcsp.sentinel.dashboard.server=localhost:8080 -Dproject.name=sentinel-dashboard -jar sentinel-dashboard-1.8.6.jar
|
| 配置 |
说明 |
| -Dserver.port |
dashboard服务端口。Java服务中dashboard配置的端口号 |
| -Dcsp.sentinel.dashboard.server |
控制台的地址和端口 |
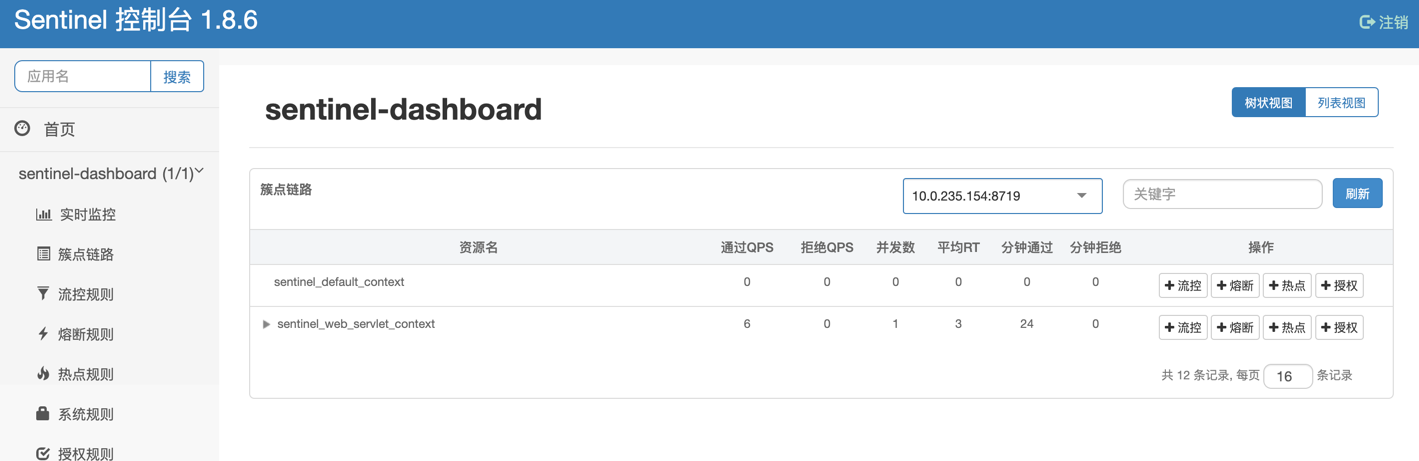
启动之后界面如下: 我们可以看到sentinel自己的运行情况和配置相关的规则
启动应用
配置完如上配置,我们就可以启动网关等应用了。因为要模拟请求,所以我多创建了一个test应用,用来进行网关转发请求。这时候你如果观察dashboard控制台,你会发现只有一个项目sentinel-dashboard,很疑惑,我们的star-gateway项目为什么没有,经过我查找资料和身体力行,我发现原来在sentinel的dashboard中,并不是应用启动就会注册,只有当第一个请求进来,才会出现我们注册的应用。如下:

我们可以发现我们的应用也出现了,nacos中的配置也自动注册到了对应的规则中,如果我们要改变配置,可以在dashboard中修改,也可以nacos中修改。但是,sentinel-dashboard上修改不能同步到nacos,反之则可以,所以推荐在nacos上修改
dashboard配置规则如下:
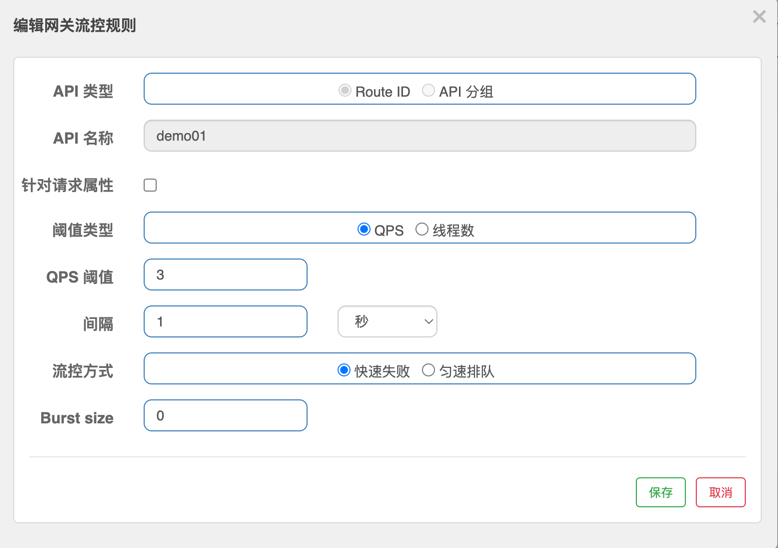
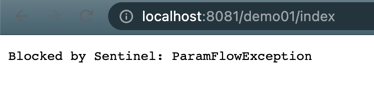
应用请求
我们通过多次尝试请求urlhttp://localhost:8081/demo01/index ,根据配置,通过QPS来做限流,阀值为3,超出阀值之后就会出现如下报错,这样证明我们的限流配置生效了。