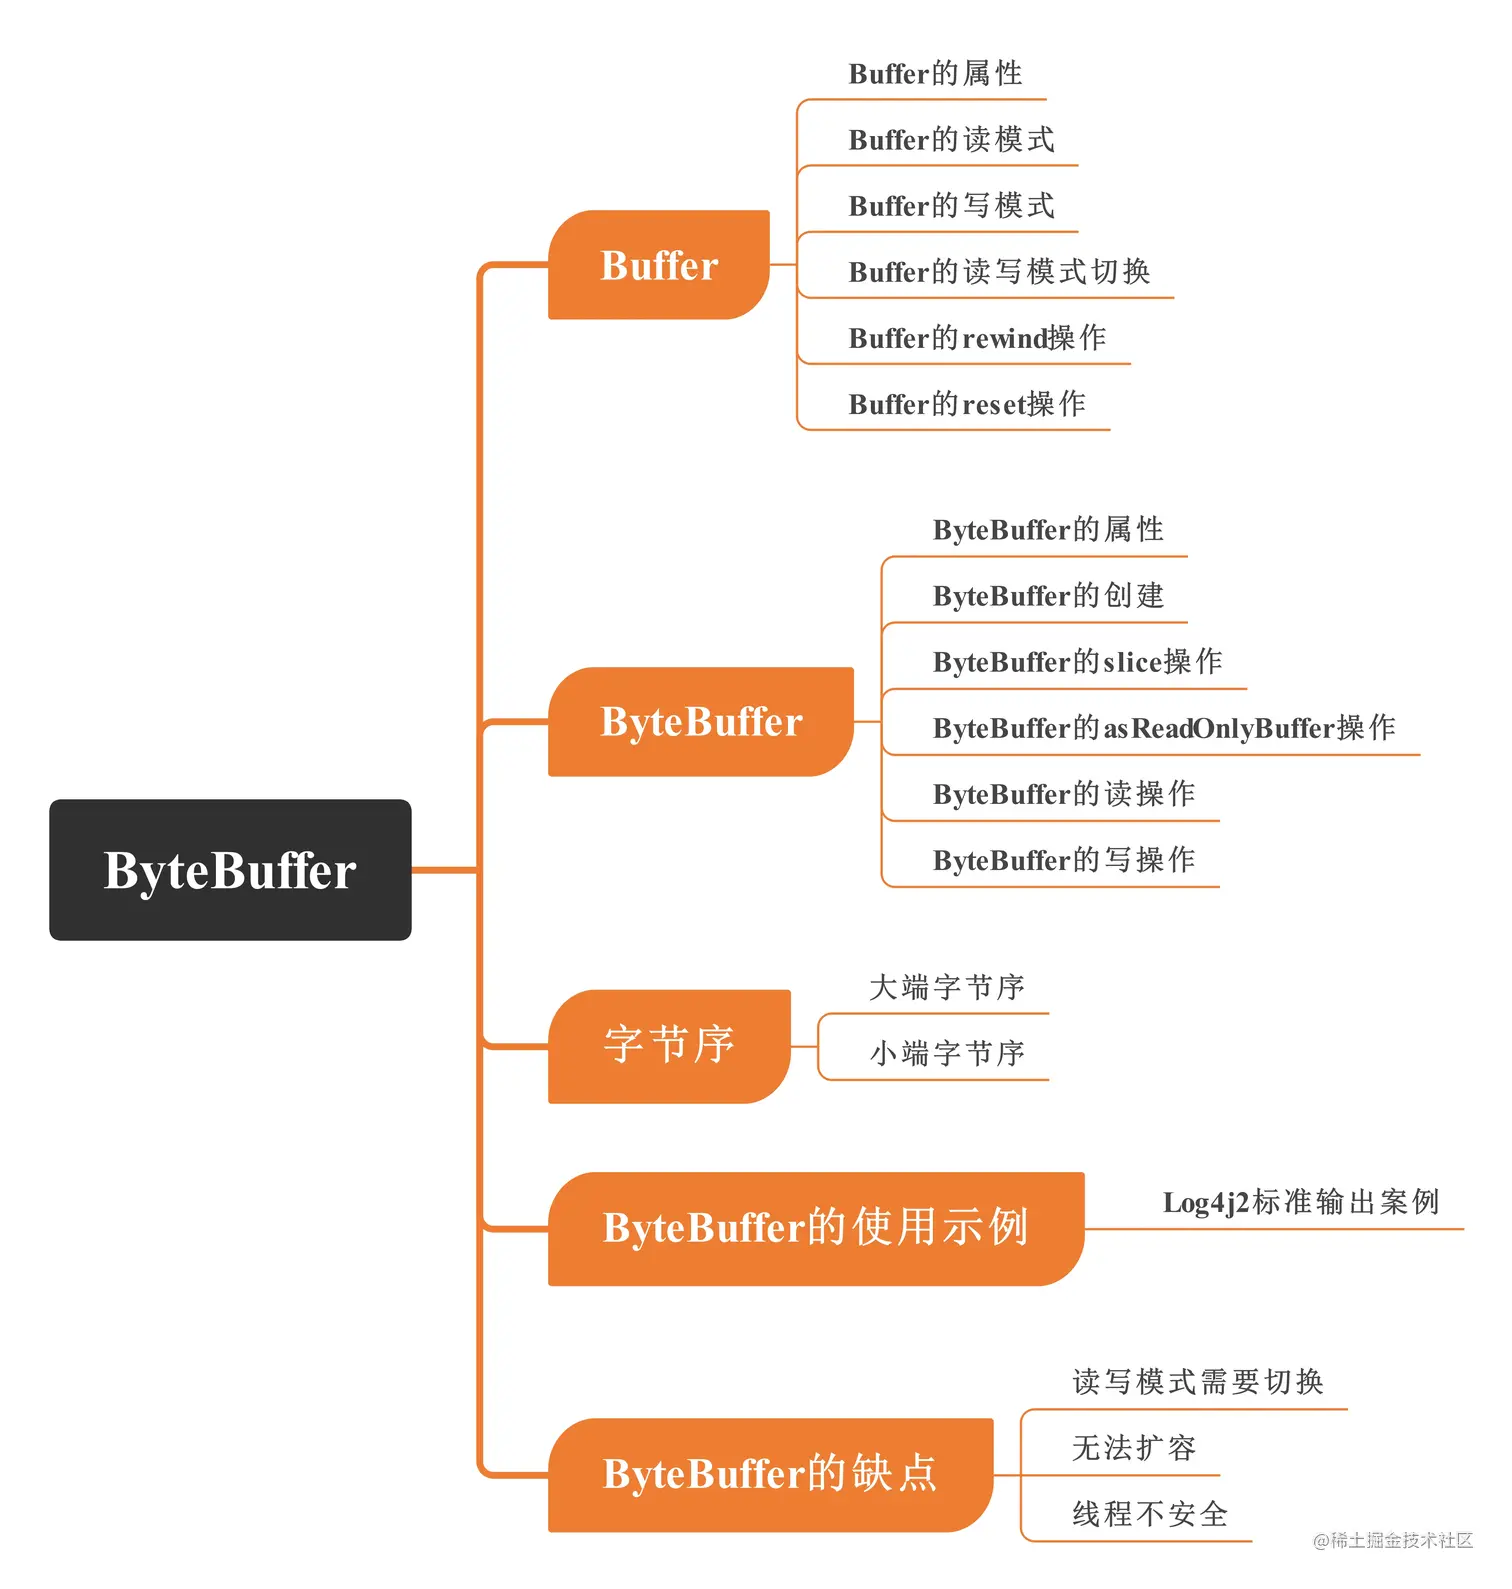
ByteBuffer
为了避免操作一下字节数组的繁琐和避免重复造轮子,jdk推出了bytebuffer作为载体操作字节数组。netty是一个网络框架,也推出了类似的载体netty.ByteBuf
前置知识
已知NIO的主要包括三个组件: Buffer, Channel, Selector。Buffer就是作为一个消息的载体,在Channel中进行传递,用户可以从中获取消息,也可以把消息放入其中进行传递。
ByteBuffer就是Buffer的子类,是字节缓冲区,特点如下:
- 大小不可变
- 读写灵活
- 支持堆上内存分配和直接内存分配
Buffer
缓冲区是特定的基本类型元素的线性有限序列。出去内容,和包含三个重要的元素: capacity, limit, position
- capacity: 元素集包含的数量。它不会为负数也不会变
- limit: 不能读写的第一个元素的索引。它不会为负数也不会比capacity大
- position: 下一个读写的元素的索引。它不会为负数也不会比limit大
线程安全
在多线程环境下,buffer不是线程安全的。如果多线程访问,需要进行同步控制
只读情况
- 每个buffer都是可读的,但不是每个都可写。
- 突变方法在只读缓冲区进行操作,就会抛出 ReadOnlyBufferException 异常
- 一个只读的缓冲区,内容不可变,但是
position、limit、mark是可变的
- 缓冲区是可以只读,可以通过调用方法
isReadOnly()来确认
Marking and resetting
缓冲区的mark是在调用reset方法时position被重置到的索引。
mark不会一定被定义,如果定义它的话,一定不为负数并且小于position。
如果position或者limit被调整为小于mark,那么它将被舍弃。
如果mark没有定义,调用reset()方法就会抛出异常InvalidMarkException
大小关系
0 <= mark <= position <= limit <= capacity
一个新创建的buffer通常position都为0,mark也是未定义。初始化的limit也许是0,也许是取决于缓冲区及其构造方法。当然,新分配的缓冲区元素为0
常用方法
- clear(): 设置
limit的值为capacity,把position置0。把buffer的通道置为read状态
- flip(): 设置
limit的值为当前的position,之后再把position置为0。把buffer的通道置为write状态
- rewind(): 对已经操作的区域可以重新操作,它保留限制不变,并将
position设置为零
- slice(): 创建一个buffer的子序列。保留
limit和position不变
- duplicate(): 浅拷贝,保留
limit和position不变
ByteBuffer
相对于buffer,多了三个新的属性:
- byte[] hb: 字节数组。仅仅在heap buffers中用到
- int offset: 偏移量。仅仅在heap buffers中用到
- isReadOnly: 是否只读。仅仅在heap buffers中用到
创建ByteBuffer
| 方法 |
说明 |
类型 |
| allocateDirect(int capacity) |
capacity 和 limit 相同。position 为0。mark 为 -1。hb 为null |
DirectByteBuffer |
| allocate(int capacity) |
capacity 和 limit 相同。position 为0。mark 为 -1。hb 为cap长度的byte[] |
HeapByteBuffer |
| wrap(byte[] array,int offset, int length) |
hb为array。limit为array + offset 的和。cap为array的长度。potision为off的值 |
HeapByteBuffer |
| wrap(byte[] array) |
hb为array。offset 为0。limit与cap均为array的长度。 |
HeapByteBuffer |
因为ByteBuffer是抽象类,所以基本都是使用实现类实例化,它主要有两个实现类:
- HeapByteBuffer: 在堆上分配内存
- DirectByteBuffer: 在直接内存中分配内存
1
2
3
4
5
6
7
8
9
10
11
12
13
14
15
16
17
18
19
20
21
22
23
24
25
26
27
28
29
30
31
32
33
34
35
36
37
38
39
40
41
42
43
44
45
46
47
48
49
50
51
52
53
54
55
56
57
58
59
60
61
62
|
DirectByteBuffer(int cap) {
super(-1, 0, cap, cap, null);
boolean pa = VM.isDirectMemoryPageAligned();
int ps = Bits.pageSize();
long size = Math.max(1L, (long)cap + (pa ? ps : 0));
Bits.reserveMemory(size, cap);
long base = 0;
try {
base = UNSAFE.allocateMemory(size);
} catch (OutOfMemoryError x) {
Bits.unreserveMemory(size, cap);
throw x;
}
UNSAFE.setMemory(base, size, (byte) 0);
if (pa && (base % ps != 0)) {
address = base + ps - (base & (ps - 1));
} else {
address = base;
}
cleaner = Cleaner.create(this, new Deallocator(base, size, cap));
att = null;
}
public void clean() {
if (remove(this)) {
try {
this.thunk.run();
} catch (final Throwable var2) {
AccessController.doPrivileged(new PrivilegedAction<Object>() {
public Void run() {
if (System.err != null) {
(new Error("Cleaner terminated abnormally", var2)).printStackTrace();
}
System.exit(1);
return null;
}
});
}
}
}
public void run() {
if (address == 0) {
return;
}
UNSAFE.freeMemory(address);
address = 0;
Bits.unreserveMemory(size, capacity);
}
|
Buffer中的部分方法
以下方法都会出现在其实现类中,比如获取position等参数
1
2
3
4
5
6
7
8
9
10
11
12
13
14
15
16
17
18
19
20
21
22
23
24
25
26
27
28
29
30
31
32
33
34
35
36
37
38
39
40
41
|
long address;
final int nextPutIndex() {
int p = position;
if (p >= limit)
throw new BufferOverflowException();
position = p + 1;
return p;
}
final int nextPutIndex(int nb) {
int p = position;
if (limit - p < nb)
throw new BufferOverflowException();
position = p + nb;
return p;
}
final int checkIndex(int i) {
if ((i < 0) || (i >= limit))
throw new IndexOutOfBoundsException();
return i;
}
final int checkIndex(int i) {
if ((i < 0) || (i >= limit))
throw new IndexOutOfBoundsException();
return i;
}
final int nextGetIndex() {
int p = position;
if (p >= limit)
throw new BufferUnderflowException();
position = p + 1;
return p;
}
|
ByteBuffer中内置方法
Java17中的实现
- putArray(int index, byte[] src, int offset, int length)
1
2
3
4
5
6
7
8
9
10
11
12
13
14
15
16
17
18
19
20
21
| private ByteBuffer putArray(int index, byte[] src, int offset, int length) {
if (((long)length << 0) > Bits.JNI_COPY_FROM_ARRAY_THRESHOLD) {
long bufAddr = address + ((long)index << 0);
long srcOffset = ARRAY_BASE_OFFSET + ((long)offset << 0);
long len = (long)length << 0;
try {
SCOPED_MEMORY_ACCESS.copyMemory(null, scope(), src, srcOffset, base(), bufAddr, len);
} finally {
Reference.reachabilityFence(this);
}
} else {
int end = offset + length;
for (int i = offset, j = index; i < end; i++, j++) {
this.put(j, src[i]);
}
}
return this;
}
|
- getArray(int index, byte[] dst, int offset, int length)
1
2
3
4
5
6
7
8
9
10
11
12
13
14
15
16
17
18
19
20
|
private ByteBuffer getArray(int index, byte[] dst, int offset, int length) {
if (((long)length << 0) > Bits.JNI_COPY_TO_ARRAY_THRESHOLD) {
long bufAddr = address + ((long)index << 0);
long dstOffset = ARRAY_BASE_OFFSET + ((long)offset << 0);
long len = (long)length << 0;
try {
SCOPED_MEMORY_ACCESS.copyMemory(scope(), null, base(), bufAddr, dst, dstOffset, len);
} finally {
Reference.reachabilityFence(this);
}
} else {
int end = offset + length;
for (int i = offset, j = index; i < end; i++, j++) {
dst[i] = get(j);
}
}
return this;
}
|
写方法
分类如下:
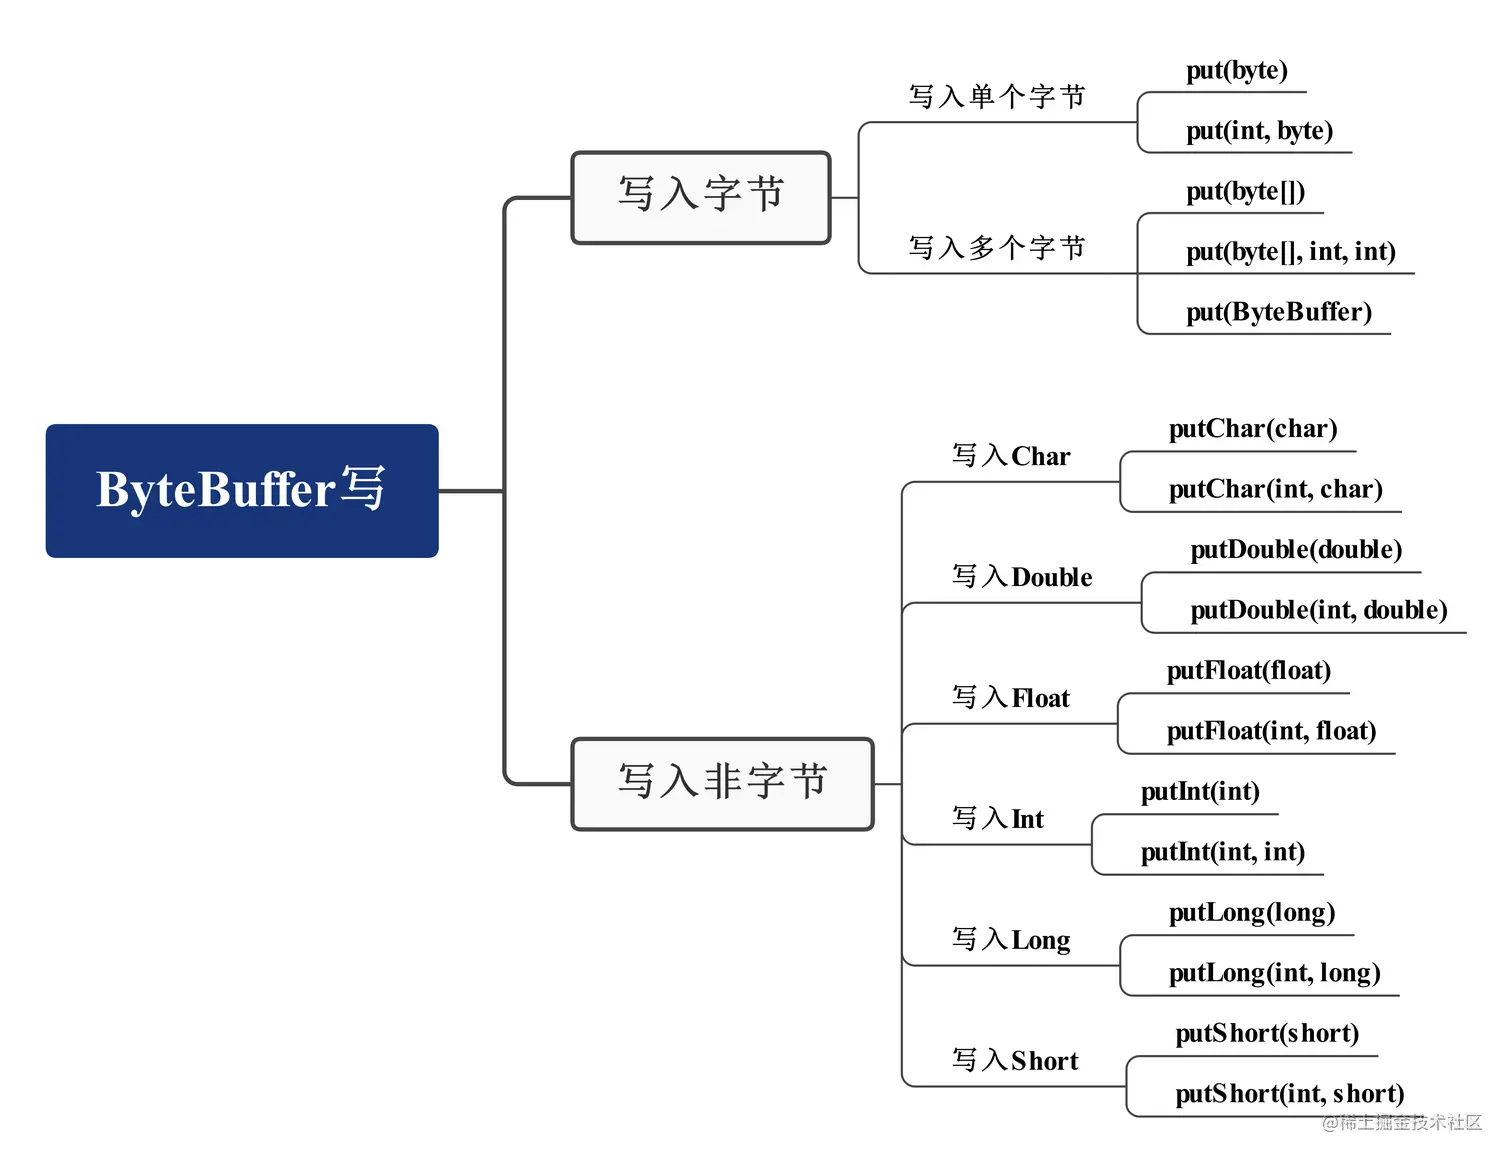
put(byte)
最简单的写入方法,Java17中,
DirectByteBuffer: 直接内存
1
2
3
4
5
6
7
8
9
10
11
12
13
| public ByteBuffer put(byte x) {
try {
SCOPED_MEMORY_ACCESS.putByte(scope(), null, ix(nextPutIndex()), ((x)));
} finally {
Reference.reachabilityFence(this);
}
return this;
}
private long ix(int i) {
return address + ((long)i << 0);
}
|
1
2
3
4
5
6
7
8
9
|
public ByteBuffer put(int i, byte x) {
try {
SCOPED_MEMORY_ACCESS.putByte(scope(), null, ix(checkIndex(i)), ((x)));
} finally {
Reference.reachabilityFence(this);
}
return this;
}
|
- put(byte[] src, int offset, int length): java17中没有进行重写,默认使用的直接内存
1
2
3
4
5
6
7
8
9
10
11
12
13
14
| public ByteBuffer put(byte[] src, int offset, int length) {
if (isReadOnly())
throw new ReadOnlyBufferException();
Objects.checkFromIndexSize(offset, length, src.length);
int pos = position();
if (length > limit() - pos)
throw new BufferOverflowException();
putArray(pos, src, offset, length);
position(pos + length);
return this;
}
|
- put(ByteBuffer src): 放入ByteBuffer
1
2
3
4
5
6
7
8
9
10
11
12
13
14
15
16
17
18
19
20
21
22
23
24
25
26
27
28
29
30
31
32
33
34
35
36
37
38
39
40
41
42
43
| public ByteBuffer put(ByteBuffer src) {
if (src == this)
throw createSameBufferException();
if (isReadOnly())
throw new ReadOnlyBufferException();
int srcPos = src.position();
int srcLim = src.limit();
int srcRem = (srcPos <= srcLim ? srcLim - srcPos : 0);
int pos = position();
int lim = limit();
int rem = (pos <= lim ? lim - pos : 0);
if (srcRem > rem)
throw new BufferOverflowException();
putBuffer(pos, src, srcPos, srcRem);
position(pos + srcRem);
src.position(srcPos + srcRem);
return this;
}
void putBuffer(int pos, ByteBuffer src, int srcPos, int n) {
Object srcBase = src.base();
assert srcBase != null || src.isDirect();
Object base = base();
assert base != null || isDirect();
long srcAddr = src.address + ((long)srcPos << 0);
long addr = address + ((long)pos << 0);
long len = (long)n << 0;
try {
SCOPED_MEMORY_ACCESS.copyMemory(src.scope(), scope(), srcBase, srcAddr,base, addr, len);
} finally {
Reference.reachabilityFence(src);
Reference.reachabilityFence(this);
}
}
|
- ByteBuffer putFloat(float value)
1
2
3
4
5
6
7
8
9
10
11
| private ByteBuffer putFloat(long a, float x) {
try {
int y = Float.floatToRawIntBits(x);
SCOPED_MEMORY_ACCESS.putIntUnaligned(scope(), null, a, y, bigEndian);
} finally {
Reference.reachabilityFence(this);
}
return this;
}
|
SCOPED_MEMORY_ACCESS
从DirectByteBuffer的put()方法中,我们可以看到直接内存的存储是调用的SCOPED_MEMORY_ACCESS的静态方法。
查看源码,我们可以看到它是类ScopedMemoryAccess的中的一个静态属性,而且已经初始化,是当前自身类的对象。从注释看,该类定义低级方法来访问堆上和堆外内存。
它对Unsafe类方法的包装,所有方法接受ScopedMemoryAccess.Scope参数,并通过它校验是否可以在安全的方式下访问内存。
单线程下访问内存,不会出问题,当多线程下,提供了对并发访问释放同一块内存区域的管理功能
1
2
3
4
5
6
7
8
9
10
11
12
13
14
15
16
17
18
19
20
21
22
23
24
25
26
27
28
29
30
31
| public class ScopedMemoryAccess {
private static final ScopedMemoryAccess theScopedMemoryAccess = new ScopedMemoryAccess();
public static ScopedMemoryAccess getScopedMemoryAccess() {
return theScopedMemoryAccess;
}
public void putByte(Scope scope, Object base, long offset, byte value) {
try {
putByteInternal(scope, base, offset, value);
} catch (Scope.ScopedAccessError ex) {
throw new IllegalStateException("This segment is already closed");
}
}
public void copyMemory(Object srcBase, long srcOffset,
Object destBase, long destOffset,
long bytes) {
copyMemoryChecks(srcBase, srcOffset, destBase, destOffset, bytes);
if (bytes == 0) {
return;
}
copyMemory0(srcBase, srcOffset, destBase, destOffset, bytes);
}
}
|
HeapByteBuffer: 堆上分配 put
put(byte b): 直接放入
1
2
3
4
5
| public ByteBuffer put(byte x) {
hb[ix(nextPutIndex())] = x;
return this;
}
|
put(int i, byte x): 指定index放入
1
2
3
4
| public ByteBuffer put(int i, byte x) {
hb[ix(checkIndex(i))] = x;
return this;
}
|
put(byte[] src, int offset, int length): java17中,只在HeapByteBuffer中里进行了重写
1
2
3
4
5
6
7
8
9
10
11
12
| public ByteBuffer put(byte[] src, int offset, int length) {
checkScope();
Objects.checkFromIndexSize(offset, length, src.length);
int pos = position();
if (length > limit() - pos)
throw new BufferOverflowException();
System.arraycopy(src, offset, hb, ix(pos), length);
position(pos + length);
return this;
}
|
读方法
DirectByteBuffer
get(): 最简单的get()方法
get(byte[] dst): 将当前字节转移到给定的目标字节数组中,具体实现是调用下面的方法。如果读取的长度超出buffer剩余的长度就会抛出异常
get(byte[] dst, int offset, int length): 同上
1
2
3
4
5
6
7
8
9
10
11
12
13
14
15
16
17
18
19
20
21
22
23
24
| public byte get() {
try {
return ((SCOPED_MEMORY_ACCESS.getByte(scope(), null, ix(nextGetIndex()))));
} finally {
Reference.reachabilityFence(this);
}
}
public ByteBuffer get(byte[] dst) {
return get(dst, 0, dst.length);
}
public ByteBuffer get(byte[] dst, int offset, int length) {
Objects.checkFromIndexSize(offset, length, dst.length);
int pos = position();
if (length > limit() - pos)
throw new BufferUnderflowException();
getArray(pos, dst, offset, length);
position(pos + length);
return this;
}
|
get(int i)
1
2
3
4
5
6
7
| public byte get(int i) {
try {
return ((SCOPED_MEMORY_ACCESS.getByte(scope(), null, ix(checkIndex(i)))));
} finally {
Reference.reachabilityFence(this);
}
}
|
getFloat()
getFloat(int i)
1
2
3
4
5
6
7
8
9
10
11
12
13
14
15
16
17
18
19
20
21
22
23
24
| public float getFloat() {
try {
return getFloat(ix(nextGetIndex((1 << 2))));
} finally {
Reference.reachabilityFence(this);
}
}
public float getFloat(int i) {
try {
return getFloat(ix(checkIndex(i, (1 << 2))));
} finally {
Reference.reachabilityFence(this);
}
}
private float getFloat(long a) {
try {
int x = SCOPED_MEMORY_ACCESS.getIntUnaligned(scope(), null, a, bigEndian);
return Float.intBitsToFloat(x);
} finally {
Reference.reachabilityFence(this);
}
}
|
HeapByteBuffer
get()
get(int i)
get(byte[] dst): 该方法默认实现的都一样,具体不同在于下面的方法
get(byte[] dst, int offset, int length): hb单独实现
1
2
3
4
5
6
7
8
9
10
11
12
13
14
15
16
17
18
19
|
public byte get() {
return hb[ix(nextGetIndex())];
}
public byte get(int i) {
return hb[ix(checkIndex(i))];
}
public ByteBuffer get(byte[] dst, int offset, int length) {
checkScope();
Objects.checkFromIndexSize(offset, length, dst.length);
int pos = position();
if (length > limit() - pos)
throw new BufferUnderflowException();
System.arraycopy(hb, ix(pos), dst, offset, length);
position(pos + length);
return this;
}
|
getFloat(): 获取
getFloat(int i)
1
2
3
4
5
6
7
8
9
10
11
12
13
14
15
16
17
|
private long byteOffset(long i) {
return address + i;
}
public float getFloat() {
int x = SCOPED_MEMORY_ACCESS.getIntUnaligned(scope(), hb, byteOffset(nextGetIndex(4)), bigEndian);
return Float.intBitsToFloat(x);
}
public float getFloat(int i) {
int x = SCOPED_MEMORY_ACCESS.getIntUnaligned(scope(), hb, byteOffset(checkIndex(i, 4)), bigEndian);
return Float.intBitsToFloat(x);
}
|
简单使用
总结
参考:一文搞懂ByteBuffer使用与原理